Install and configure a tracker server
Resilio Tracker is installed automatically with the Management Console. If you need the tracker service to run on a different host or network, you can deploy a standalone Resilio Tracker instance.
Prerequisites
Before installing Resilio Tracker, make sure that:
-
The port you plan to use for the Tracker server (TCP/UDP 3000 by default) is open for incoming connections. If the Tracker server is behind a firewall, make sure that the firewall allows incoming connections to this port. If the Tracker server is behind NAT, make sure that port forwarding is configured for this port. For more details about ports and protocols used by Resilio Active Everywhere, see Ports, Protocols and Port Forwarding.
Tip
When installing Tracker server on Windows, the installer will add corresponding rules to the Windows Firewall to allow incoming connections on the default Tracker port.
Install Tracker
Windows
To install Resilio Tracker on Windows:
- Download, then launch the Resilio Tracker installer.
- On the welcome page, click Next.
- Choose the destination folder, then click Next.
-
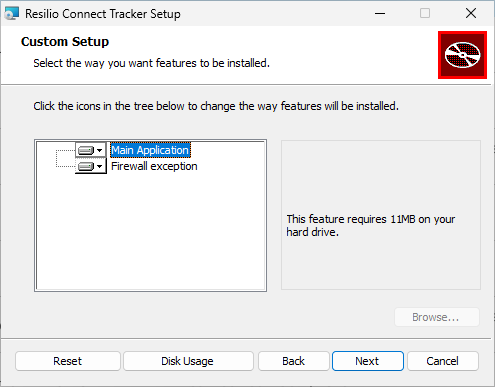
(Optional) Customize your installation, then click Next.
- Main Application - The core Resilio Tracker service.
- Firewall exception - Rules in Windows Firewall allowing Resilio Tracker to establish network connections.
Note
If you choose not to install Firewall exception, make sure that the firewall on the Tracker server host allows incoming connections to the Tracker port (TCP/UDP 3000 by default). If the Tracker server is behind NAT, make sure that port forwarding is configured for this port.
-
Click Install to proceed.
- Click Finish to close the installer.
Change default Tracker port
By default, the Resilio Tracker service listens on the port number 3000.
By default Resilio Tracker listens on all interfaces on IPv4 and IPv6 address range, both UDP and TCP, port 3000.
  PS C:\Users> netstat -ano | findstr 3000
  TCP    0.0.0.0:3000           0.0.0.0:0              LISTENING       6012
  TCP    10.255.0.39:55639      172.16.0.67:3000       SYN_SENT        5980
  TCP    [::]:3000              [::]:0                 LISTENING       6012
  UDP    0.0.0.0:3000           *:*                                    6012
  UDP    [::]:3000              *:*                                    6012
  PS C:\Users>
To change the port number the tracker service listens on:
- Open Command Prompt as Administrator and navigate to the tracker's binary file location.
-
Delete the Resilio Connect Tracker service:
-
Register Tracker server as a Windows service with the desired port:
-
Active Everywhere 5.x and newer
ConnectTracker.exe -sr --port 12345 -
Active Everywhere 3.x and 4.x
ConnectTracker.exe -sr -p 12345
where
12345is the desired port number. -
-
Create a new service with the
--portparameter specifying the port number:ConnectTracker.exe -sr --port 12345
-
Start the service.
Linux
DEB and RPM packages availability
DEB and RPM Resilio Tracker packages are available for Resilio Active Everywhere 3.8 and newer.
Requirements
- Firewall rules allowing incoming connections to the port you plan for your Tracker server (TCP/UDP 3000 by default). If the Tracker server is behind NAT, make sure that port forwarding is configured for this port.
- x64 hardware architecture (amd64, x86_64).
-
A Linux distribution with the
systemdinit manager.Note
Even though a legacy
init.dscript is included in the package, it is not guaranteed to work on every GNU/Linux distribution; therefore, using a distribution withsystemdis recommended.
Linux - Tarball
To install Resilio Management Console on Linux from a tarball archive:
-
Download, then extract the Management Console tarball archive:
sudo tar xvf tracker.tar.gz -C /opt -
Start Tracker server:
sudo /opt/resilio_tracker/tracker
Tracker service startup options
-
To allow only encrypted connections, start Tracker server with the
--enforce-tlsparameter (applicable to Resilio 6.0 and newer):sudo /opt/resilio_tracker/tracker --enforce-tls -
To allow only select ciphers, start Tracker server with the
--tls-ciphers <ciphers>parameter (applicable to Resilio 6.0 and newer, for list of available ciphers, see ):sudo /opt/resilio_tracker/tracker --tls-ciphers='TLS_AES_256_GCM_SHA384,TLS_CHACHA20_POLY1305_SHA256' -
To force Tracker server to listen on a different port, start it with the
-p <port>parameter.sudo /opt/resilio_tracker/tracker -p 12345
Script execution permissions
If the tracker service fails to start, make sure it has execution permissions. If not, set them with the following command:
sudo chmod +x /opt/resilio_tracker/tracker
By default Tracker listens on all interfaces on IPv4 and IPv6 address range, both UDP and TCP, port 3000

Linux - DEB
To install Resilio Tracker on Linux from a DEB package:
-
Download the
.debpackage, then run the following command:sudo dpkg -i resilio-connect-tracker_<version>_<architecture>.deb -
Enable automatic startup of the Resilio Tracker service:
sudo systemctl enable resilio-connect-tracker -
Start the Resilio Tracker service:
sudo systemctl start resilio-connect-tracker
systemd and init.d manager options
- Options to manage the service through
systemdmanager:systemctl start/stop/disable/status -
Options to manage the service through
init.dmanager (not recommended):sudo /etc/init.d/resilio-connect-tracker start sudo /etc/init.d/resilio-connect-tracker stop
Running the service as current user
By default the Tracker service runs as rsltracker user. To run the Tracker service as a current user:
-
Check the serice's status:
systemctl status resilio-connect-tracker -
(Conditional) Stop the Tracker service:
systemctl stop resilio-connect-tracker -
Start the Tracker service as current user:
sudo systemctl --user start resilio-connect-tracker
Change tracker service listening port
To change the default port number that the tracker service lisetens on:
-
Stop the Tracker service:
sudo systemctl stop resilio-connect-tracker -
Edit the Tracker service file:
sudo nano /etc/systemd/system/resilio-connect-tracker.service -
In the
ExecStartline, change the port number:[Unit] Description=Resilio Connect Tracker service Documentation=https://connect.resilio.com After=network.target [Service] Type=simple User=rsltracker Group=rsltracker UMask=0002 Restart=on-failure LimitNOFILE=1000000 TimeoutSec=600 ExecStart=/opt/resilio-connect-tracker/tracker -p 12345 [Install] Alias=resilio-connect-tracker WantedBy=multi-user.target
Uninstall Resilio Tracker installed from a DEB package
To uninstall Resilio Tracker installed from a DEB package:
sudo dpkg --purge resilio-connect-tracker
Linux - RPM
To install Resilio Tracker on Linux from an RPM package:
-
Download the
.rpmpackage, then run the following command:sudo yum install resilio-connect-tracker-<version>_<architecture>.rpm -
Enable automatic startup of the Resilio Tracker service:
sudo systemctl enable resilio-connect-tracker -
Start the Resilio Tracker service:
sudo systemctl start resilio-connect-tracker
systemd and init.d manager options
- Options to manage the service through
systemdmanager:systemctl start/stop/disable/status -
Options to manage the service through
init.dmanager (not recommended):sudo /etc/init.d/resilio-connect-tracker start sudo /etc/init.d/resilio-connect-tracker stop
Uninstall Resilio Tracker installed from an RPM package
To uninstall Resilio Tracker installed from an RPM package:
sudo yum remove resilio-tracker
Tracker connection encryption
Info
Available in Resilio 6.0 and newer.
Resilio Tracker supports TLS encryption for connections between Agents and the Tracker server (both standalone and when the tracker runs with the Management Console). Agent versions 6.0 and newer establish encrypted connections; older Agent versions do not. By default, Tracker allows establishing unencrypted connections to ensure backwards compatibility, but you can choose to allow only encrypted connections.
For more information, see Tracker connection encryption.
Connect Tracker to the Management Console
Resilio Tracker must be added in the Management Console before it can take on tracker duties for connected Agents.
To add a Resilio Tracker server:
-
In the Management Console, select Settings > Auxiliary servers.

-
In the Trackers section, click + ADD TRACKER.

-
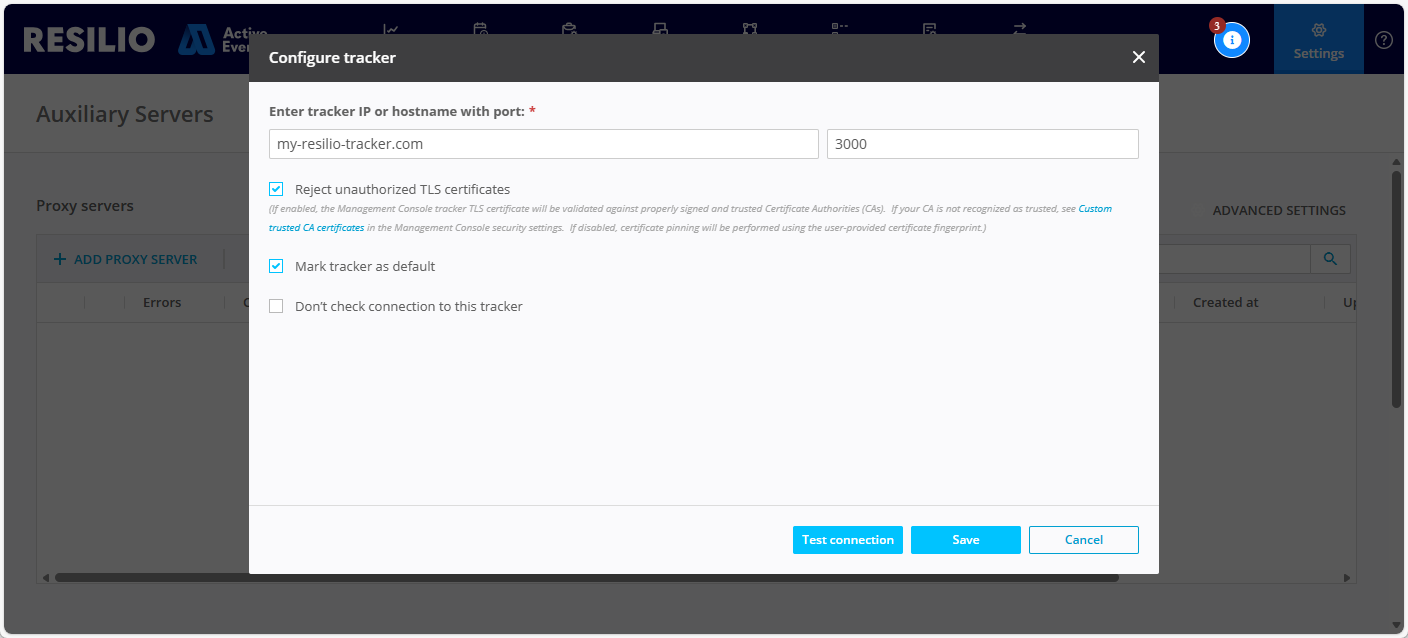
In the Configure tracker window:
-
Enter the IP address or the hostname of your tracker server and the port number on which the tracker service is running.
Note
This can be local or public IP address, or a DNS hostname. The Port number 3000 is the default tracker service port number.
-
Select Reject unauthorized TLS certificates to validate the TLS certificate against a trusted Certificate Authority.
Note
Available in Resilio 6.0 and newer.
-
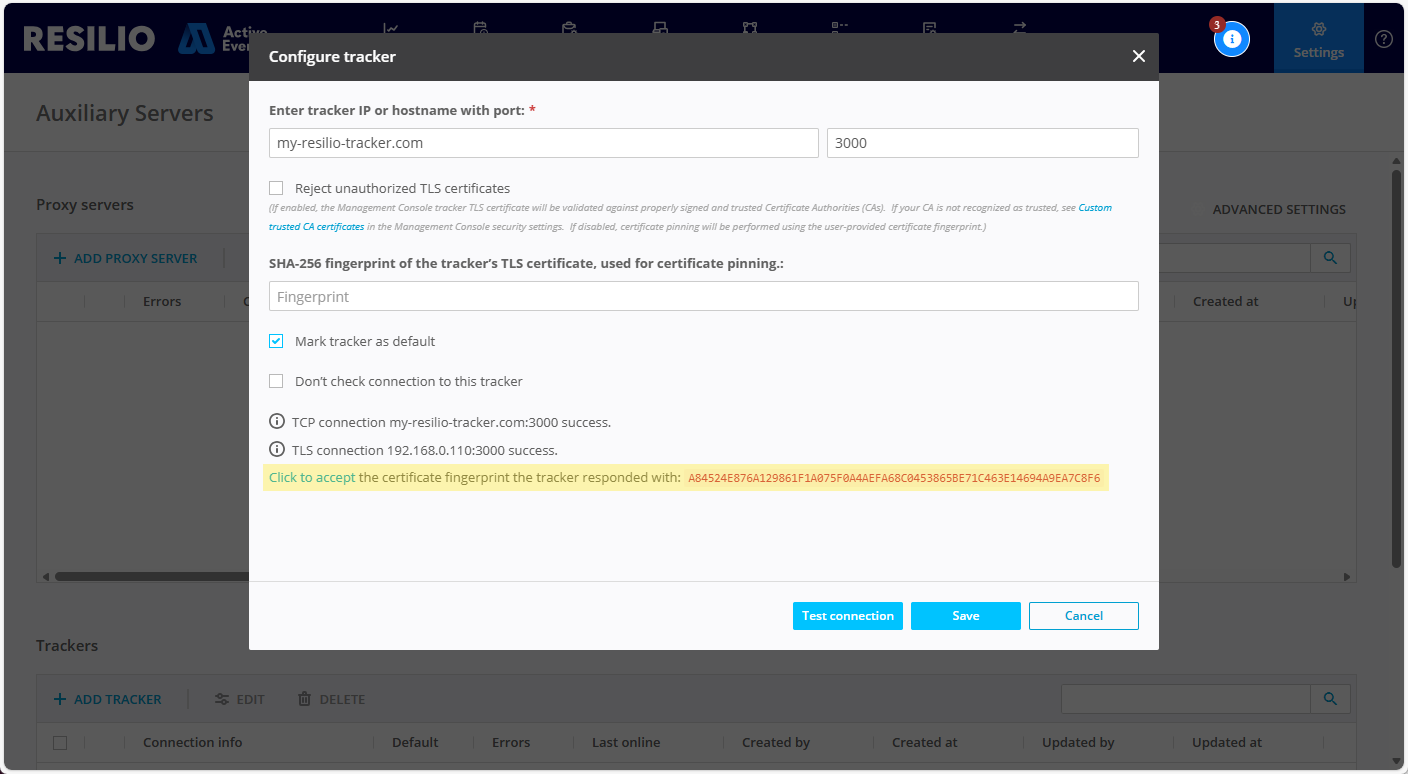
(Optional) Provide tracker server TLS certificate fingerprint to perform certificate pinning and ensure connections to valid tracker server.
Note
- Available in Resilio 6.0 and newer.
- Applicable if you deselect the Reject unauthorized TLS certificates option.
-
If you don't provide a fingerprint and you run the connection test, the Management Console will fetch the fingerprint and give you the option to use the value in the form.
-
Select Mark tracker as default to include this tracker in the default tracker servers list.
-
(Optional) Select Don’t check connection to this tracker if you know the Management Console cannot reach the tracker server (for example, if the Management Console is on a LAN network, behind a firewall, or the tracker's public IP address is for WAN agents connections purpose). Otherwise, the Management Console will report an error.
Note
If you add a tracker server with this option enabled, the tracker will appear on the list without a status icon and with Not available as the Last online status.

-
(Optional) Click Test connection to perform connection test.
-
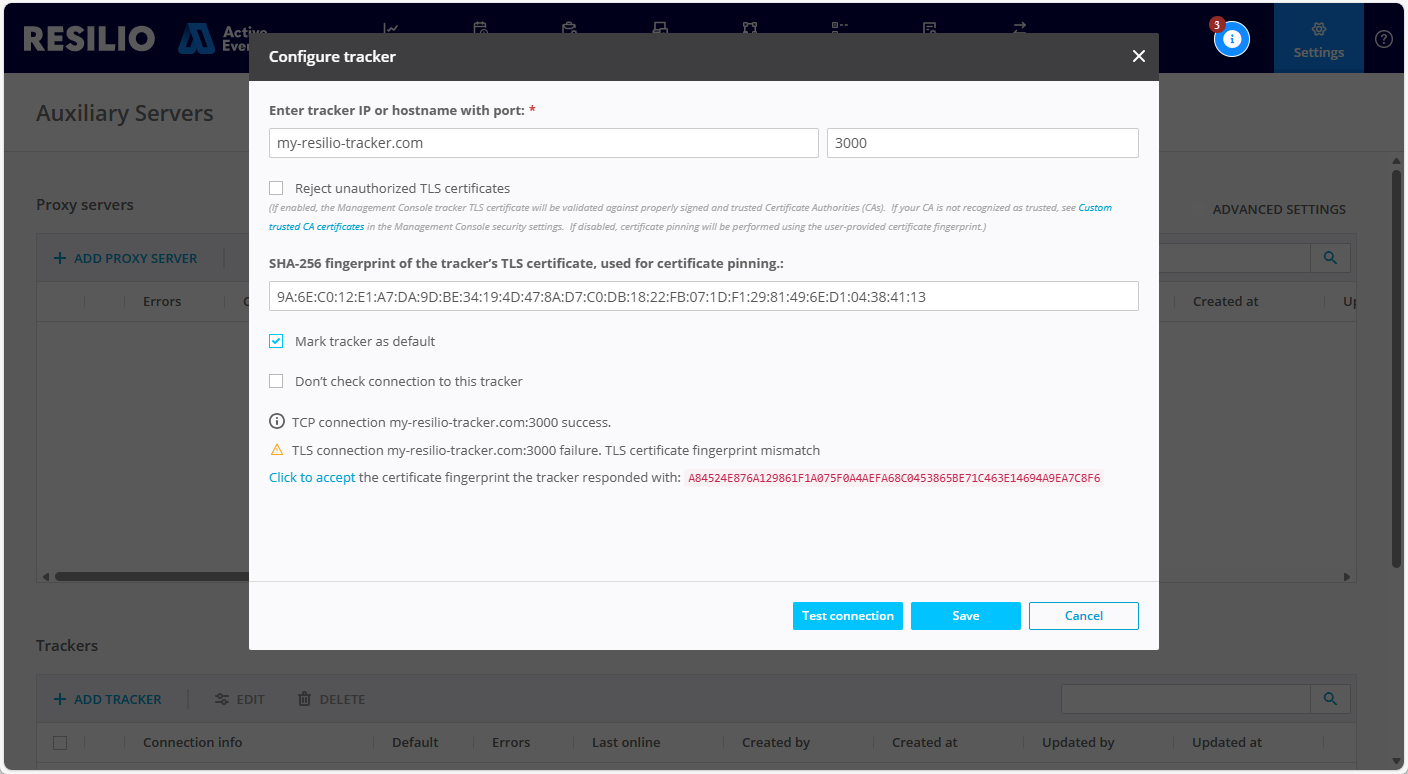
(Optional) Accept the certificate fingerprint that the tracker server responded with.
Note
If you provide a fingerprint, the Management Console will verify it against the one that the tracker server responds with and will report a mismatch if the two are different.
-
Click Save.
-
Use Tracker in the Profile
Starting with Resilio Connect v2.12, notion of a Default tracker server is introduced. The tracker which is installed on the Management Console host is marked as default. This is configurable and any other, manually installed, can be selected as default. It's possible to configure several default trackers. This is the tacker that will be used by the agents by default unless any other is specifically configured in the Agent Profile. It's not possible to delete the last default tracker. If checkbox "Default" is selected in the Agent Profile, the agents will use either of the 'default' trackers in load balancing or high availability mode.
