System Requirements and Prerequisites - Enterprise Hybrid Work Job
System requirements
IT environment
Enterprise Hybrid Work Job requires a Windows domain environment (Microsoft Active Directory or Entra Domain Services).
Deployment
We recommend deploying the Management Console and the Primary Storage Agent on the same host, in close proximity to the file server to minimize latency and maximize performance.
Management Console and Primary Storage Agent
These are the minimum requirements for running the Management Console and the Primary Storage Agent for a 100 users deployment:
- Operating system: Windows Server 2022 or newer
- CPU: 8 cores
- RAM: 64 GB
- Storage: 200 GB (assuming single VM for MC and Primary Storage Agent)
- Network: public DNS name or IP address
User Agents
These are the minimum requirements for user Agents participating in Enterprise Hybrid Work Jobs:
- Operating system: Windows 11 x64 (Windows Enterprise multi-session is not supported); macOS 26 (Tahoe)
- Local admin permissions for Agent installation
Network setup
Before you proceed with setting up Resilio Active Everywhere 6.0 for Enterprise Hybrid Work Job perform the following steps to set up your network:
-
Open network ports and set up port forwarding to allow traffic to Resilio services.
Management Console
Port Protocol Description 8443 TCP Management Console web interface. 8444 TCP Resilio Agent control traffic. 8446 TCP API gateway. 3000 TCP and UDP (incoming) Tracker service.
Note: By default, the tracker runs on the same machine as the Management Console, but it can be placed on another machine if preferred.Info
Additionally, Management Console reaches out to the following Resilio's public servers:
https://connect-license.resilio.com/check_connect.phpon port 443.
Checking license updates. Every 24 Hours or upon service startup. If there are unlicensed Agents, the Management Console checks for license updates very 10 minutes.https://upload.resilio.com/upon port 443
Create Support Case (with automated Log upload). Manual log uploads go tohttps://feedback.resilio.com/ which is a link to https://upload.resilio.com/up
Agent
Port Protocol Description 3000 TCP and UDP (outgoing) Tracker Server
Note: UDP is optional and if your organization doesn't allow it the Tracker will still work.3839 TCP and UDP Data transfer between Agents.
Note: If each of the Agents is behind a NAT or firewall (pfSense in particular), it may required to:- Set up port forwarding for at least one of Agents.
- Configure external port. Add custom parameter
external_portwith a port number to the Agent's Profile. Otherwise, it's not guaranteed that the outgoing traffic will be forwarded through the same data transfer port, which will make connection impossible between such Agents.
- Resilio Agents can be configured to transfer data using only TCP or UDP if your organization limits the transmission of one these protocols.
- To ensure optimal performance, we recommend allowing UDP traffic between Agents.
For more information, see Ports and Protocols.
-
Ensure that the host running the Management Console and the Primary Storage Agent is accessible via a public hostname or IP address.
Active Directory setup
Important
Applying the following configuration changes in Active Directory requires domain administrator privileges.
SPN assignments and delegation
Before you proceed with setting up Resilio Active Everywhere 6.0 for Enterprise Hybrid Work Job perform the following steps to set up your Windows domain environment:
- Ensure that the system designated to run the Management Console and the Primary Storage Agent is a domain-joined Windows Server 2022 (or newer) machine that meets the minimum requirements.
-
Assign service principal names (SPNs) for the Management Console and the Primary Storage Agent.
-
Management Console
The Management Console SPN is required to authenticate Agents using the Kerberos-SPNEGO protocol. This protocol is always used by the Primary Storage Agent. Optionally, end user Agents can use it as well if their machines are domain-joined.Note
The Management Console runs under the Local System account (machine account), therefore the SPN must be assigned to the machine account, not to a service account.
SPN format:
rslmc/<management-console-fqdn>CMD command:
setspn -S rslmc/<management-console-fqdn> <computer-account>where:
rslmcis the Management Console's service class name.<management-console-fqdn>is the fully qualified domain name of the host running the Management Console.-
<computer-account>is the computer account name in the Active Directory.Tip: Computer account name
Computer account name is usually the same as the hostname of the machine, unless the machine is renamed after joining the domain.
Example: Set Management Console SPN
setspn -S rslmc/resilio-server.corp.example.com resilio-server -
Primary Storage Agent
The Primary Storage Agent SPN is required to allow the Agent to impersonate end users when accessing the file server. This allows the Agent to access files on behalf of end users, respecting their permissions and access rights.Note
The Primary Storage Agent runs under the Local System account (machine account), therefore the SPN must be assigned to the machine account, not to a service account.
SPN format:
rsl/<primary-storage-agent-fqdn>CMD command:
setspn -S rsl/<primary-storage-agent-fqdn> <computer-account>where:
rslis the Primary Storage Agent's service class name.<primary-storage-agent-fqdn>is the fully qualified domain name of the host running the Primary Storage Agent.-
<computer-account>is the computer account name in the Active Directory assigned to the host running the Primary Storage Agent.Tip: Computer account name
Computer account name is usually the same as the hostname of the machine, unless the machine is renamed after joining the domain.
Example: Set Primary Storage Agent SPN
setspn -S rsl/resilio-server.corp.example.com resilio-server
-
-
Enable delegation for the Primary Storage Agent to allow it to impersonate end users when accessing the file server:
Using Remote Server Administration Tools
To enable impersonation using Remote Server Administration Tools:
-
Install Remote Server Administration Tools for powershell:
Install-WindowsFeature -Name RSAT-AD-PowerShell -
Configure delegation (impersonation):
$ImpersonatingAccount = Get-ADComputer -Identity resilio-server
Set-ADComputer file-server -PrincipalsAllowedToDelegateToAccount @($ImpersonatingAccount)
where:
resilio-serveris the computer account name in the Active Directory assigned to the host running the Primary Storage Agent.file-serveris the computer account name in the Active Directory assigned to the file server host.
Using Active Directory Users and Computers snap-in
To enable impersonation using Active Directory Users and Computers snap-in:
- Open Active Directory Users and Computers snap-in.
- Locate the
Computeraccount for the host serving as the Primary Storage device, right-click it and select Properties. -
Select the Delegation tab, then select Trust this computer for delegation to specified services only > Use any authentication protocol.
Important
Selecting the option to use any authentication protocol is required.
-
Click Add, then click Users or Computers.
- In the opened window, enter the name of the file server host, click Check Names to verify it, then click OK.
- In the list of services, select
cifsand click OK.
Sensitive domain accounts
Delegation is disabled for sensitive accounts: Protected users group members, accounts with Account is sensitive and cannot be delegated option enabled. Delegation must be allowed for end-user accounts.
-
Multiple Active Directory domains
To allow end user Agents to authenticate using accounts from multiple domains, users outside the domain that the Management Console is deployed in, must be in a Global or Universal scope group as external Domain Local scope groups cannot be queried.
In case of end user Agents deployed in domains in different forests, ensure that the Management Console and the Primary Storage Agent are deployed in a domain that has two-way trust relationships with other domains. For more information, see How trust relationships work for forests in Active Directory.
Foreign Security Principal objects
Management Console cannot list Foreign Security Principal (FSP) objects within a group. If you have a group, containing users from other trusted domains as Foreign Security Principal objects, Management Console won't be able to access those users and add them to the Job. You must assign users and groups from each domain separately.
User accounts properties
User accounts in Active Directory must have UserPrincipalName (UPN) property assigned. UPN is used for delegation (impersonation) and to link users between OpenID providers (Entra ID, Okta) and Active Directory. Users without UPN assigned cannot participate in Enterprise Hybrid Work Jobs. The presence of the UPN can be verified in user management UI or with PowerShell command:
Entra ID/Okta setup for end user authentication
Important: User Agent authentication
You cannot have user Agents using different authentication methods. Once you enable user Agent authentication via Open ID Connect compliant identity provider, all user Agents must authenticate using this method. Agents that previously authenticated using Active Directory will no longer be able to connect to the Management Console, unless they are reconfigured to use the Open ID Connect authentication method.
Entra ID
Note
This guide assumes that Entra is synchronized with the domain where the Management Console and Primary Storage Agent are deployed. This can be either an on-premise domain controller or EDS (Entra Domain Services).
To setup Entra ID for end user Agents authentication:
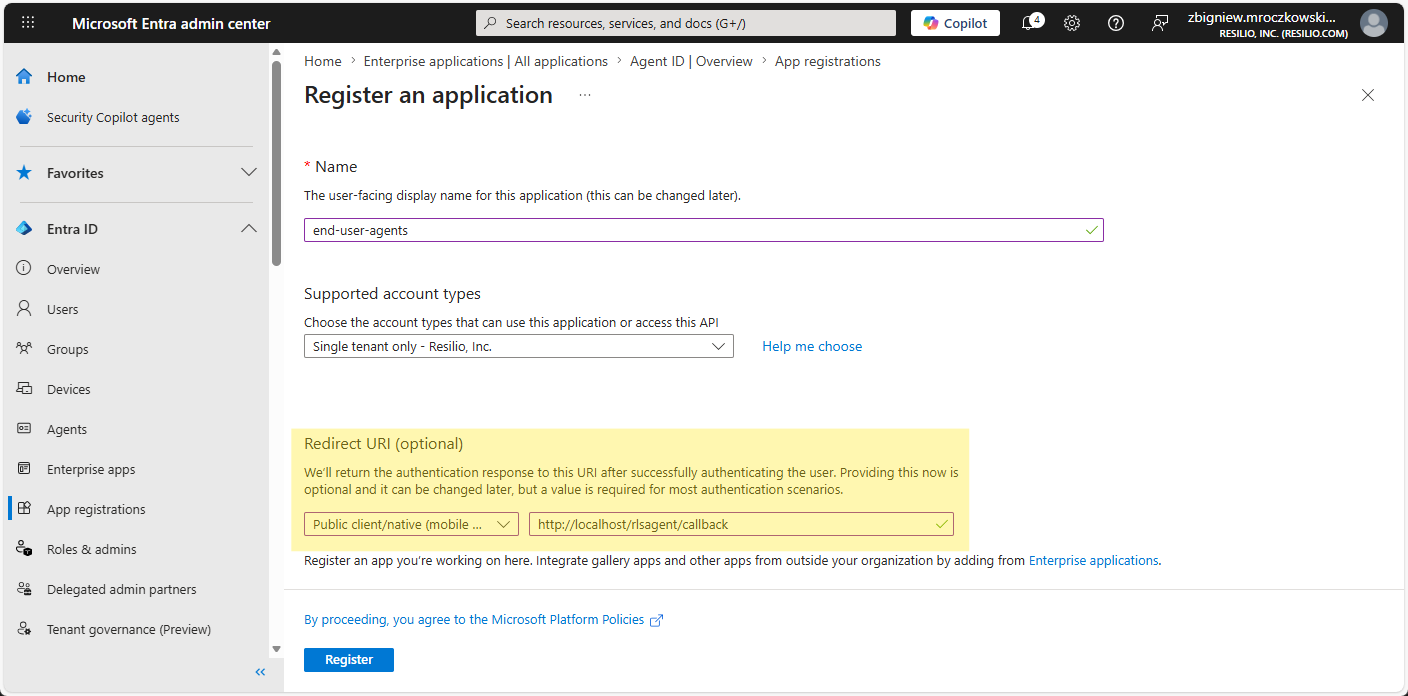
- In Microsoft Entra admin center, register an application. For details, see Register an application.
When registering an application, select Single tenant only supported account type and make sure to provide a Public client/native (mobile & desktop) type redirect URI: http://localhost/rlsagent/callback.
-
Add
emailandupntoken claims:- In the registered application, select Token configuration > Add optional claim.
-
In the opened pane, choose the ID token type, select
emailandupnclaims and click Add.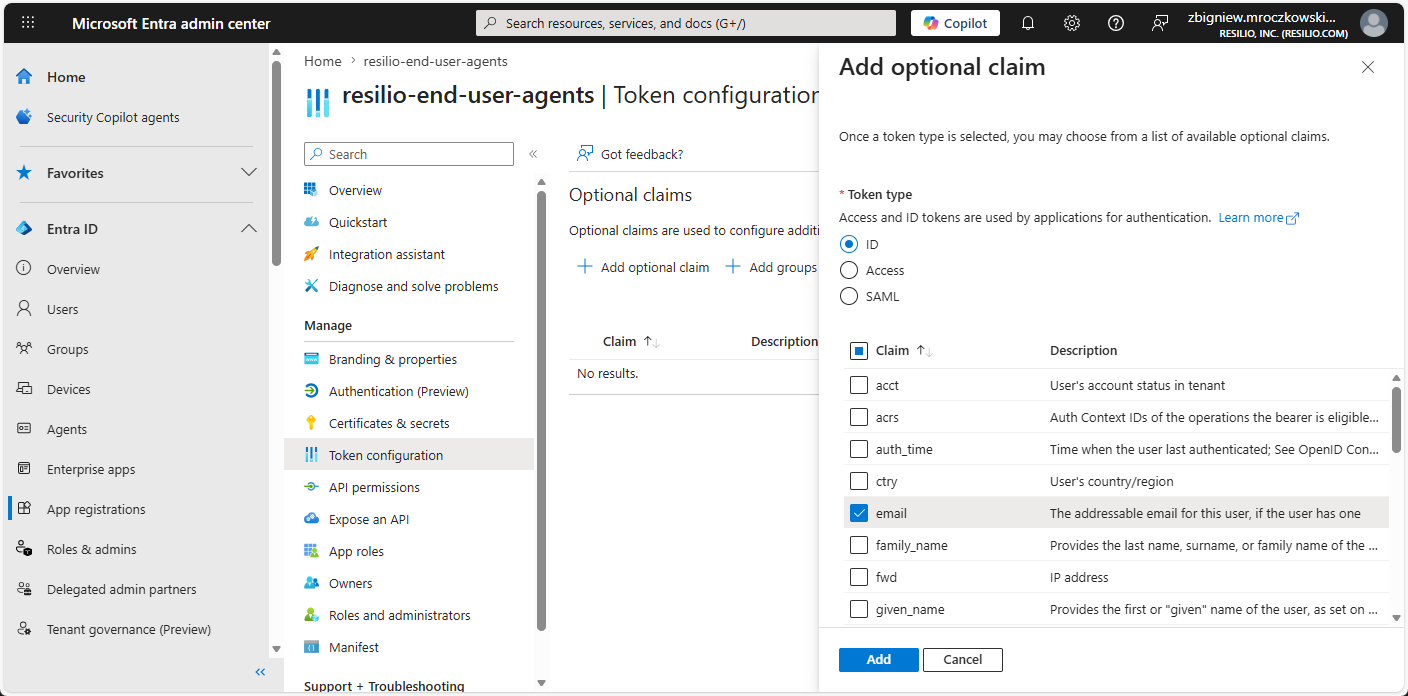
-
Select Turn on the Microsoft Graph email, profile permission (required for claims to appear in token) and click Add.
- Repeat steps a-b to add Access token type
emailandupnclaims.
-
Update the access token format in your application's manifest:
- In the registered application, select Manifest.
-
Locate the
apisection, set theaccessTokenAcceptedVersionparameter value to2and click Save.
-
Add users or groups allowed to authenticate their Resilio Agents using this application:
- Select Enterprise apps then locate and click your application.
- Select Users and groups, then click + Add user/group.
- Under Users and groups, click None Selected.
- Select users or groups to be added and click Select, then click Assign.
-
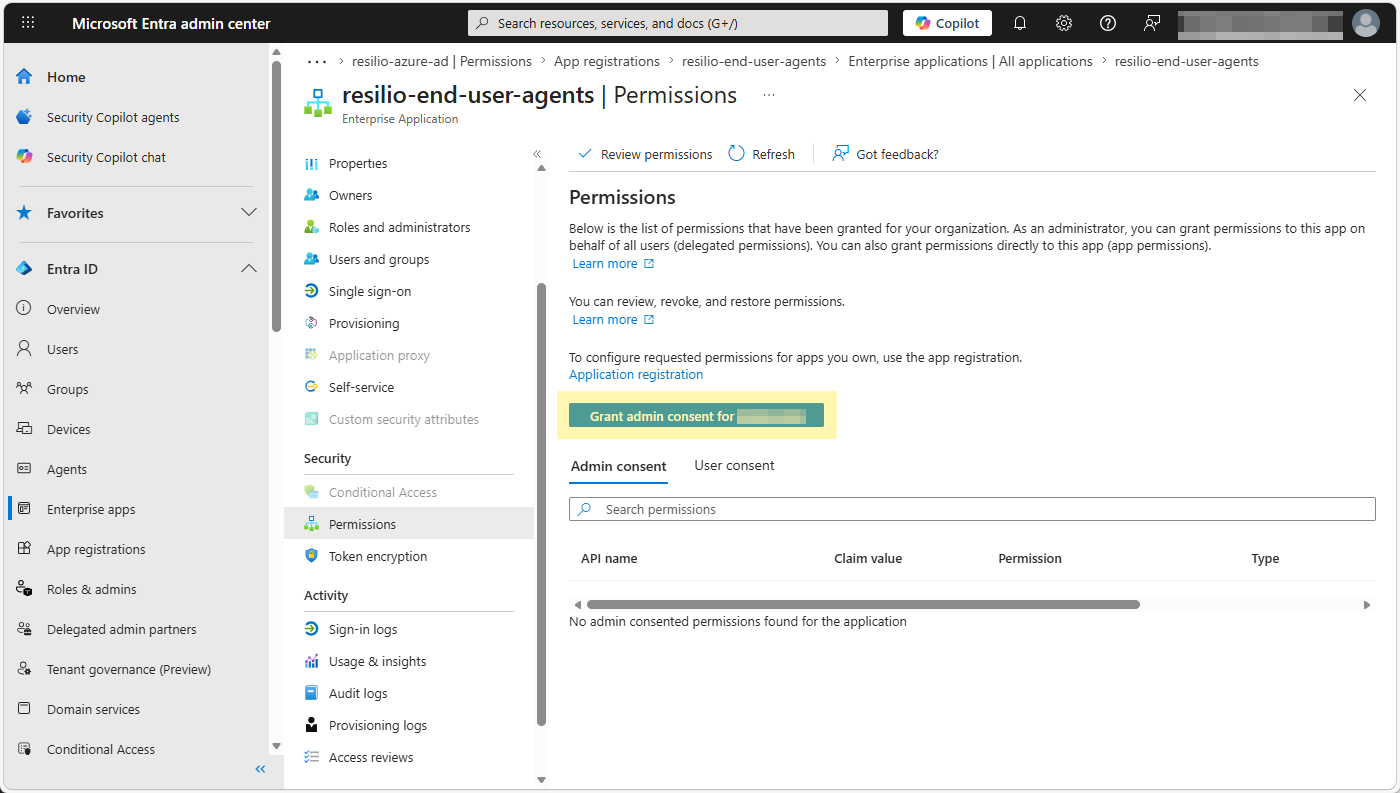
Grant admin consent for your tenant to allow the application to read user's profiles and email addresses.
- Select Enterprise apps then locate and click your application.
-
Under Security, select Permissions, then click Grant admin consent for your tenant to allow the application to read users' profiles and email addresses.
- Once the Management Console is installed, set up Agent Authentication.
Okta
Note
This guide assumes that Okta is synchronized with Active Directory where the Management Console and Primary storage are deployed, and users and groups are available in Okta. Refer to official Okta documentation.
To setup Okta for end user Agents authentication:
-
Register an application: choose Native Application application type and provide a redirect URI as follows.
http://localhost:50040/rlsagent/callbackhttp://localhost:50041/rlsagent/callbackhttp://localhost:50042/rlsagent/callback
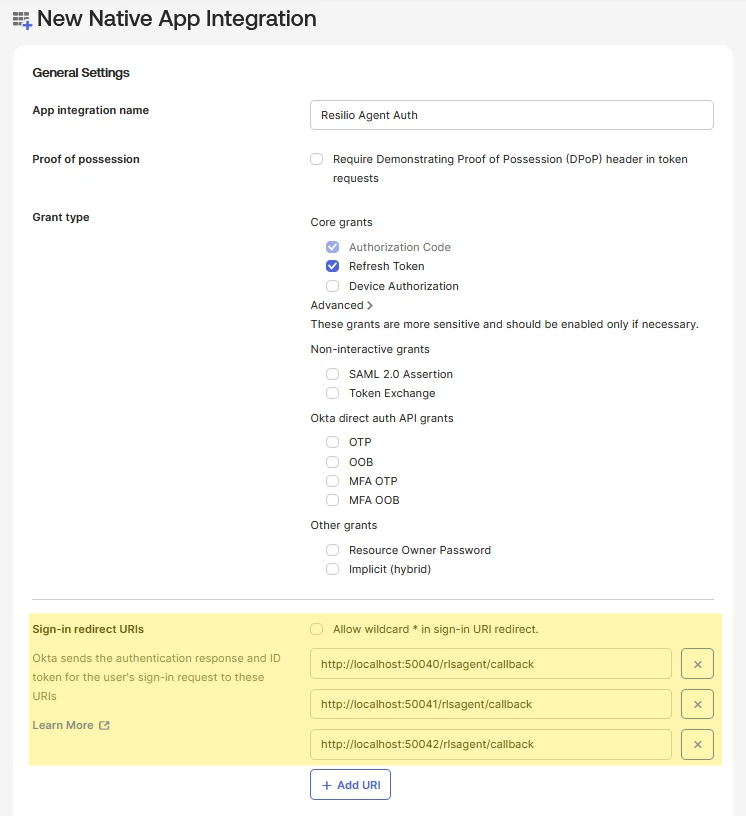
Important
Make sure to use the same ports later when setting up Agent Authentication on the Management Console.
-
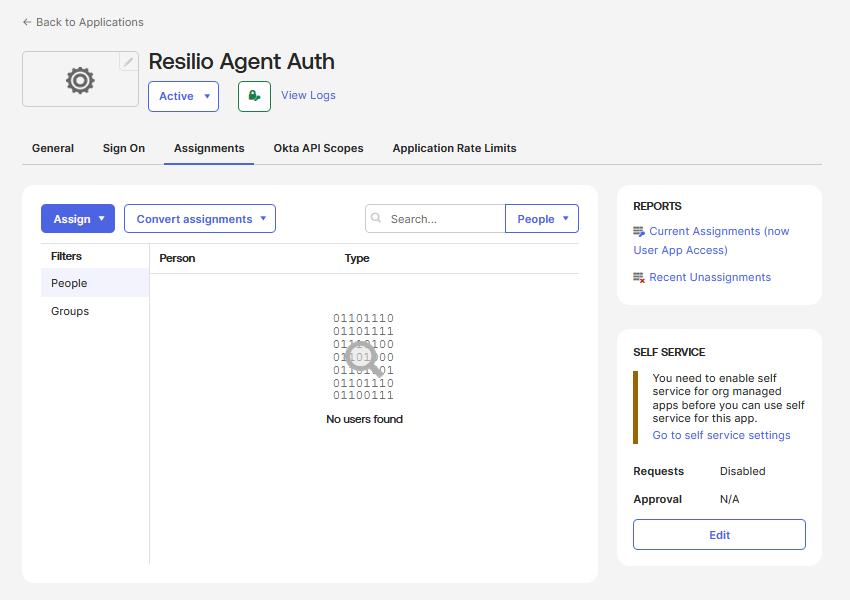
Assign users and groups as needed.
-
Ensure that the User Principal Name (UPN) is configured.
Note
Management Console uses UPN as a key to search for the user in the Active Directory. This could be configured in different ways in Okta depending on integration setup. For details, see okta Docs - Configure Active Directory import and account settings.

-
Create application authorization server.
Select Security > API > Add Authorization Server. Keep the default settings.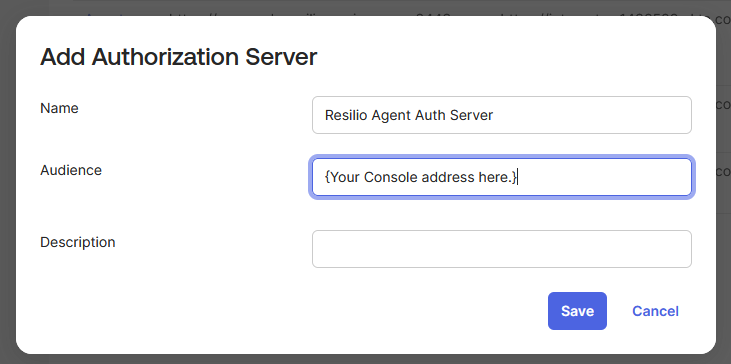
-
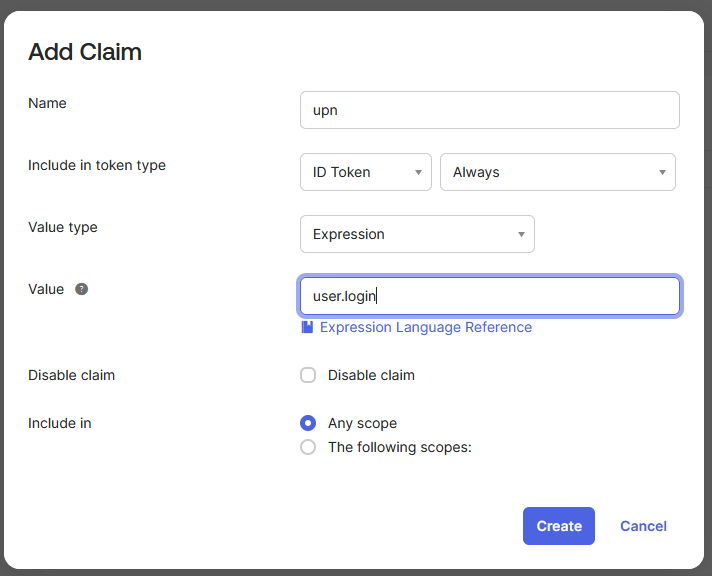
Add the following claim.
-
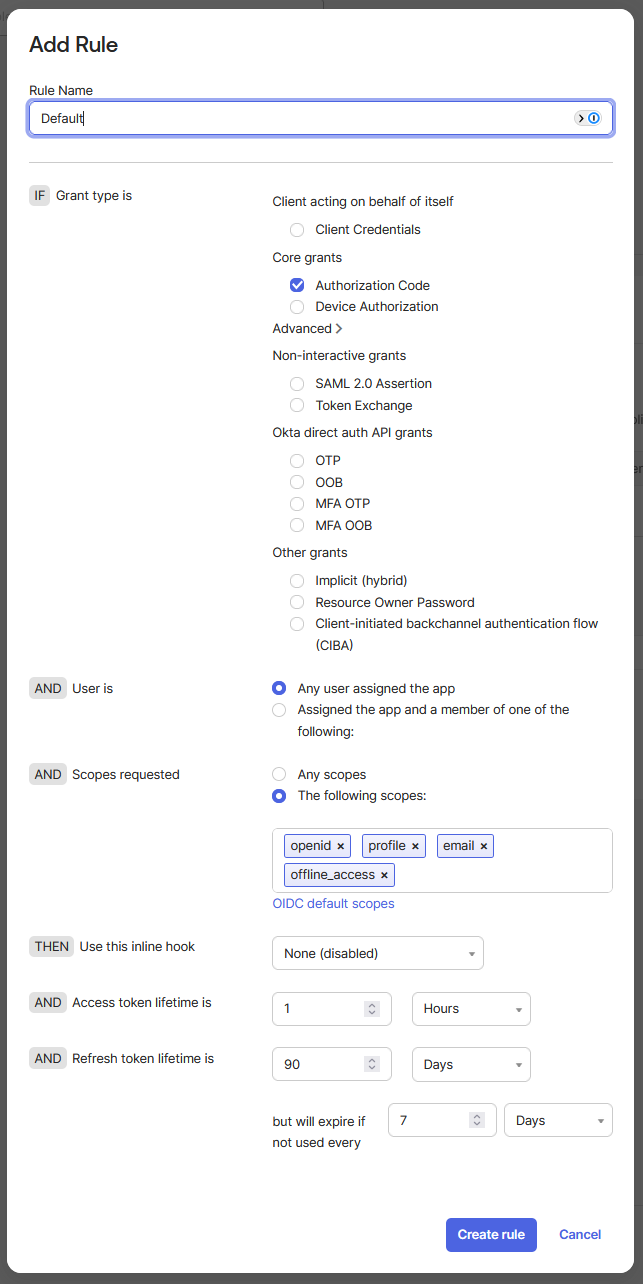
Add a new Access policy and add the rule. Adjust token lifetime to your requirements.
-
If needed, run the token preview check. Ensure that the UPN is set.
-
Once the Management Console is installed, set up Agent Authentication flow.