


In Sync Hacks, we spotlight cool uses of Sync from the creative minds of our users. Sync is our free, unlimited, and secure file-syncing application. If you have an interesting use or how-to, shoot us an email at sync[at]bittorrent.com. Can’t wait to hear what you guys cook up.
In this week’s Sync Hacks, Theron Conrey (@theronconrey) shows us how to use BitTorrent Sync as Geo-Replication for storage. We talked to Theron about why he chose Sync for this awesome project. His answer? “I like the flexibility of Sync and the encrypted transmission offering. This is more important today than ever, and if you’re moving customer data between sites you want to know it’s taken care of in flight. Sync offers a file system / storage system independent replication offering allowing for not only like array replication, but also replication to different array types.” We’re sold. Read on for his how-to.
Excerpted from Theron’s original blog, found here.
A friend pointed me at a new bittorrent lab project, Sync. While it took me a few minutes to wrap my head around what was going on and how this is being used, I’d have to say I’m impressed.
What is BitTorrent Sync?
The concept is simple, using a local client on your desktop or laptop Sync will synchronize the contents of the selected folder to other remote Sync clients sharing the same key. Synchronization is done securely via an encrypted (AES) bittorrent session. This ends up being effective for moving a lot of data across multiple devices and while I think it was initially designed for secure private dropbox style replication, I’ve been testing this as an alternative method of geo-replication between glusterfs clusters on Fedora.
Right off the bat there were a few things that got my gears turning:
a known and proven P2P protocol (monthly BitTorrent users are estimated at something insane like a quarter of a billion users)
encrypted transfers
multi platform
KISS oriented configuration
What is GlusterFS?
GlusterFS is an open source project leveraging commodity hardware and the network to create scale-out, fault tolerant, distributed and replicated NAS solutions that are flexible and highly available. It supports native clients, NFS, CIFS, HTTP, FTP, WebDAV and other protocols. (more info here)
GlusterFS has native Geo Replication. Why not use it?
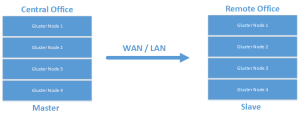
Leveraging the native GlusterFS georeplication for a single volume is a one way street today. I’m not sure if this is something that will change moving forward but today, a volume replicated is configured in a traditional Master/Slave configuration.
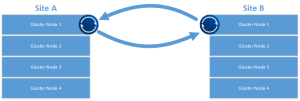
In addition to simple failover configurations, it can also be configured for cascading configurations that allow for more interesting archival type configurations.

or even:

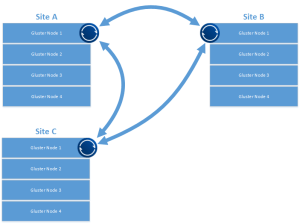
While I’m sure this works for replication and certain disaster recovery scenarios, I’m looking at multi master configurations, or with multiple datacenter configurations that are all “hot”, possibly removing the need for a centralized repository. I’d also like a scenario that allows for all sites to serve as DR locations for any other participant while leveraging the closest cluster as a data end point for writing. Something that looks a bit more like this…
This type of configuration also allows for a more easily grown environment and a quick way to bring another site online.
Leveraging bittorrent, one of the more interesting features is the optional use of a tracker service. This helps with peer discovery, letting the tracker announce SHA2(secret):IP:port to help peers connect directly. They tracker service also serves acts as a STUN server, helping with NAT traversal for peers that can’t directly see each other behind firewalls. This is interesting for environments where you don’t want to have to deal with reconfiguration of firewalls. It’s important to note thought that even leveraging the tracker service all transmission of data is encrypted in flight.
Getting Started
For quick testing, find a couple of boxes that you want to get replication moving between. These could be minimal install linux boxes, SAMBA servers for your SMB, webservers (backup replication?), or in my case, a single node of a gluster cluster. If you’re interested in getting started with gluster, here’s a good place to get started.
a quick note if you’re using gluster: On one of the nodes, make sure the glusterfs client is installed. Create a directory and using the glusterfs client mount the volume you want to have replicated. There are more complicated ways to do this, but for testing, this will work fine.
Download the client
Identify the directory you want to replicate, and go download the client from bittorrent labs for your installation. For me it was the x64 Linux client.
Configuration
First we’ll need to untar the download and get some config files ready to go. Additionally, we’ll want to build an init.d script to ensure the client is running on startup. You don’t have to do all of this, but I wanted to have it available to manage as a service.
$ tar -xf btsync.tar.gz
We’ll want to move the binary to a better location
$ sudo mv btsync /usr/bin
Next, create a directory for the configuration and generated storage files
$ sudo mkdir /etc/btsync
We should identify or create the directory we want to use as a replication target as well. As an example I’ll create a new directory….
$ sudo mkdir /replication
With our directories created and in place it’s time to generate the initial config file and edit it appropriately.
$ sudo btsync --dump-sample-config > /etc/btsync/btsync.conf
Using your favorite text editor, edit the following lines…
"device name": "My Sync Device",
to
"device name": "whateveryourhostnameis",
"storage path" : "/home/user/.sync",
to
"storage path" : "/etc/btsync",
// "pid_file" : "/var/run/syncapp/syncapppid.pid",
to
"pid_file" : "/var/run/btsync.pid",
As we’re going to identify the replicated folders via the conf file it’s important to note that the webui that is normally available for the linux client will be disabled. First thing you’ll need to do is generate a “secret” that you’re going to use for your share. from the command line:
$ sudo btsync --generate-secret
will give you a secret you can use,but I find it easier to just go ahead and dump the secret at the bottom of the conf file I’m going to use and just move it around from there.
$ sudo btsync --generate-secret >> /etc/btsync.conf
In the shared folder section look for the following line:
"secret" : "MY_SECRET_1", // * required field
and replace MY_SECRET_1 with the secret you generated. As an example:
"secret" : "GYX6MWA67INIBN5XRHBQZRTGYX6MWA67XRHPJOO6ZINIBN5OQA", // * required field
you’ll want to change the directory line as well…
"dir" : "/home/user/bittorrent/sync_test", // * required field
to
"dir" : "/replication", // * required field
In the shared folders section either edit or comment out the known host section. The easiest thing is to comment out the examples provided. Change…
"192.168.1.2:44444",
"myhost.com:6881"
to
// "192.168.1.2:44444",
// "myhost.com:6881"
IMPORTANT: You’ll need to remove the leading /* and trailing */ of the shared folders section.
With the config file set start bittorrent sync using the config set.
btsync --config /etc/btsync.conf
BTsync init script
I’m by no means claiming this is a work of art. It gets the job done though. you’ll want to create a file /etc/init.d/btsync with the following content:
[theron@blackbox ~]$ cat /etc/init.d/btsync

#!/bin/sh

#

# chkconfig: - 27 73

# description: Starts and stops the btsync Bittorrent sync client

# #

# pidfile: /var/run/bysync.pif

# config: /etc/btsync.conf
# Source function library.
. /etc/rc.d/init.d/functions
# Avoid using root’s TMPDIR
unset TMPDIR
# Source networking configuration.
. /etc/sysconfig/network
# Check that networking is up.
[ ${NETWORKING} = “no” ] && exit 1
# Check that smb.conf exists.
[ -f /etc/btsync.conf ] || exit 6
RETVAL=0
BTSYNCOPTIONS=”–config /etc/btsync.conf”
start() {
KIND=”Bittorrentsync”
echo -n $”Starting $KIND services: ”
daemon btsync “$BTSYNCOPTIONS”
RETVAL=$?
echo
[ $RETVAL -eq 0 ] && touch /var/lock/subsys/btsync || RETVAL=1
return $RETVAL
}
stop() {
echo
KIND=”Bittorrentsync”
echo -n $”Shutting down $KIND services: ”
killproc btsync
RETVAL=$?
[ $RETVAL -eq 0 ] && rm -f /var/lock/subsys/btsync
echo “”
return $RETVAL
}
restart() {
stop
start
}
rhstatus() {
status btsync
return $?
}
# Allow status as non-root.
if [ “$1” = status ]; then
rhstatus
exit $?
fi
case “$1″ in
start)
start
;;
stop)
stop
;;
restart)
restart
;;
reload)
reload
;;
status)
rhstatus
;;
condrestart)
[ -f /var/lock/subsys/btsync ] && restart || :
;;
*)
echo $”Usage: $0 {start|stop|restart|reload|status|condrestart}”
exit 2
esac
exit $?
With that done you’ll want to change the mode of that file to 755. This will allow it to be run as a service.
chmod 755 /etc/init.d/btsync
and ensure it’s run at startup:
chkconfig --add btsync

chkconfig btsync on
testing the btsync service out
With that done you should be ready to start the btsync service.
[theron@blackbox ~]$ sudo service btsync start

Starting Bittorrentsync services: BitTorrent Sync forked to background. pid = 4198

[ OK ]
Other nodes and additional thoughts
With the above in place you’ll want to configure additional btsync clients on gluster nodes (or whatever test system you’re using) at your remote locations using the same secret you used above. The mount point / local folder can be different, but the secret must be the same. This will allow for replication to start amongst the identified folders. Thanks for reading and check out other cool usescases for bittorrent sync on the bittorent sync forums.
…
Theron Conrey @theronconrey turns wrenches on public facing cloud infrastructures and blogs infrequently about virtualization, enterprise storage and fermentation at conrey.org. An active speaker at open source conferences as well as an active (and vocal) member of the vmware community, Theron is the founder of VMunderground, a community driven virtualization event.


